In The Studio
Here is where I share updates from my South-West of England studio.
Including works in progress, pigment creation and explorations of the earth.
Sign up for my newsletter to be the first to know about new gallery collections and workshops.

It’s not easy being green
It’s not easy being green

Most of my colour swatches are attempts at making the right green. Looking back over them, it is clear to see green isn’t just green – there are so many variations. Depending on the landscape I am engaged with, the time of year, the light. Green is an incredibly moveable feast. It is one of those colours that funnily enough I am not that keen on as paint and I tend to use it sparingly
I have over the years been very surprised with the green rocks that I have found and used. Many of the these are difficult to mix with other colours and have been tricky to mix on their own (low pigmentation) and gritty to work with, so to get its maximum hue it requires a lot of pigment -which is a lot of work. Both the local green pigments available to me have to be extracted from rocks, which require filing or hammering into course grit, then grinding in a mortar before levigating. This is the case with the local Garra rock I have found on the coast and the green-grey marle I have found further inland.

Garra Rock-a very hard rock that requires a lot of graft to turn into a usable pigment. It is very gritty and doesn’t mix with gum arabic that well, and tends to curdle when clay is mixed with it to make gouache. Pigmentation is low
Reading up on green earths indicates that there is an abundance and variety of lightfast colour, which has certainly not been my experience locally. However, my rocks do have their uses. Due to its grey leanings, it makes a great glaze when mixed up with gum Arabic to make a watercolour, which can be used for subtle shading or to subdue an area.

using the subtelty of this green as a wash to subdue an area in a painting
The reason my green pigment might be lacking is perhaps due to it not been cleaned thoroughly. Aparently to get all the yellow ochre and other particles out, it needs to be chemically washed….
So often I have to mix up 2 pigments to aquire green.

My all time -go -to -green is TQ postern yellow earth, Italian yellow earth and India blue -a synthetic (see link below for supplier)
Variations on a theme -drop the Italian yellow earth and the green will be muted and soft
All- time fave is charcoal and TQ postern yellow earth for a gorgeous natural olive.

charcoal and postern yellow ochre
The brightest green I have made I used nasturtium lake-nasturtium gives an amazing bright citric yellow- and an electric hot green when mixed with India Blue and given it grows like a weed, I am happy to harvest with impunity. It is a botanical however and I have swatched it and put it in a sunny spot for months, and is certainly not archival! As you can see in the picture the one on the right has lost a lot of its colour.

nasturtium lake and india blue
Given that I am working mainly with gouache (watercolour and clay) in order to gain a sense of levity in my work I have to put colours together for maximum effect. The use of complimentaries can make your colours sing-say for instance, a pink sitting next to a green, or a stripe of sienna tucked in next to a foresty-darkness.
complimentary colours for maximum effect, with pop of oil pastel green
However, recently I had a find which I am very excited about. A friend who was out running spotted some bright green flecks of colour in a sunken lane where a small landslide had happened in the hedgerow after a significant amount of rain. She promptly texted me (don’t you love friends who understand your geekiness!) with amazing photos of this find. We returned to the site a couple of days later, and there it was, bright and very obvious. This was not the hard blue marle rock that is usually found in these parts, but rather lumps of solid crumble, which easily breaks down into earth
It cleaned up well and broke down to 180 microns easily. Also, unlike the marle it mixed with auxiliaries and water well without the grittiness and hydrophobic qualities of the rock, and green earths I have bought from Italy, and it is much more highly pigmented. What have I found? Is this Terre Verte?

Bow Creek Green-
Here are some great links for information and supplies of colour from around the world!
A book I definitely have my eye on!
For amazing info on terre verte, historical info on pigments https://www.naturalpigments.com

suppliers of pigments, clay paint and the famous but expensive wallglaze
studio practice

swatcfhes using gum arabic and clay binders
How to store and use water-based pigments
How to use pigments-waterbased
After gathering your earth, you have ground it, levigated it, filtered it, dried it, sieved it and popped it into a jar, then labelled it. You have also swatched it and recorded it with the mediums you use.
So, from now on what is the best approach for everyday use?
I use watercolour and pigments mixed with claypaint which are both waterbased. The claypaint I purchase from https://www.celticsustainables.co.uk
I buy this claypaint as I go through a lot of it and for me to process the amount I use I would not be painting! To this claypaint I add my pigments that I have foraged, which produces beautiful soft muted colours, quite similar in behaviour and texture to Gouache, which is opaque. Watercolours on the other hand have transparency and luminosity and I often use these as an underpainting to provide light from within.
Recipe for watercolours:
1 part pigment:1 part gum Arabic
Put 1 teaspoon of pigment onto a glass slab in a small pile and with the back of a teaspoon create a shallow indentation. Into this pour 1 teaspoon of liquid Gum Arabic and a couple of drops of water. With a palette knife start to work the ingredients together. When all the pigment is coated in liquid, start mulling with a muller or a flat-bottomed heavy glass or paperweight.

mulling on a glass plate with muller to incorporate binder with pigment
This process of mulling isn’t about grinding the pigment finer, but is to thoroughly distribute the watercolour medium (or any medium for that matter) onto the pigment. If the mixture seems thick and resistent and hard to mull then add a few drops of water to loosen it up.When it looks and feels smooth and doesn’t sound gritty it is time to scrape it up with the palette knife and put it into jar lids, or shells or watercolour pans. I pre-label each receptacle before putting the pigment in, because I tend to do a lot of colours in one session and it is very easy to get things mixed up!
Also, I keep notes and swatches of where each colour was found and how it behaves in various applications.
Allow it to dry and be aware there will be a fair bit of shrinkage as moisture evaporates as the pigment dries off. Once dried these are very easy to store-they can be stacked up on top of one another, or thrown in a box ready to be used on a painting expedition.

watercolours stored in shells, lids, egg containers and jars
For mixing with clay paint however this is not so straightforward. Your pigment can’t just be tossed in a clay and stirred in -it needs to be thoroughly wetted before it gets with the clay. Ideally pigment should sit overnight in a MUD state before being used. And even more ideally it can be mulled on a glass with a muller for a very fine paint. This is the sort of work I set aside to do in between paintings, or on days when I just need to not think, days when I just don’t feel creative. I have a series of medium (250 ml) sized jars with lids, with MUD in them- just pigment and water, a thick honey consistency. This means you don’t waste anything- if it dries out you can just re-activate with more water. If you were to mix it with clay and store it, and the clay dries out, then you are left with something that will not reconstitute -and all that work that went into developing your pigments has gone to waste.

sadly these dried out and have to be tossed out (in the compost of course!)
So, when you are ready to use clay, just add some MUD to your clay and it will be wetted and mix in beautifully. As long as it is stored in an airtight jar and you keep checking the moisture content it can be stored-but I always forget and have wasted a lot of my pigment in the process!


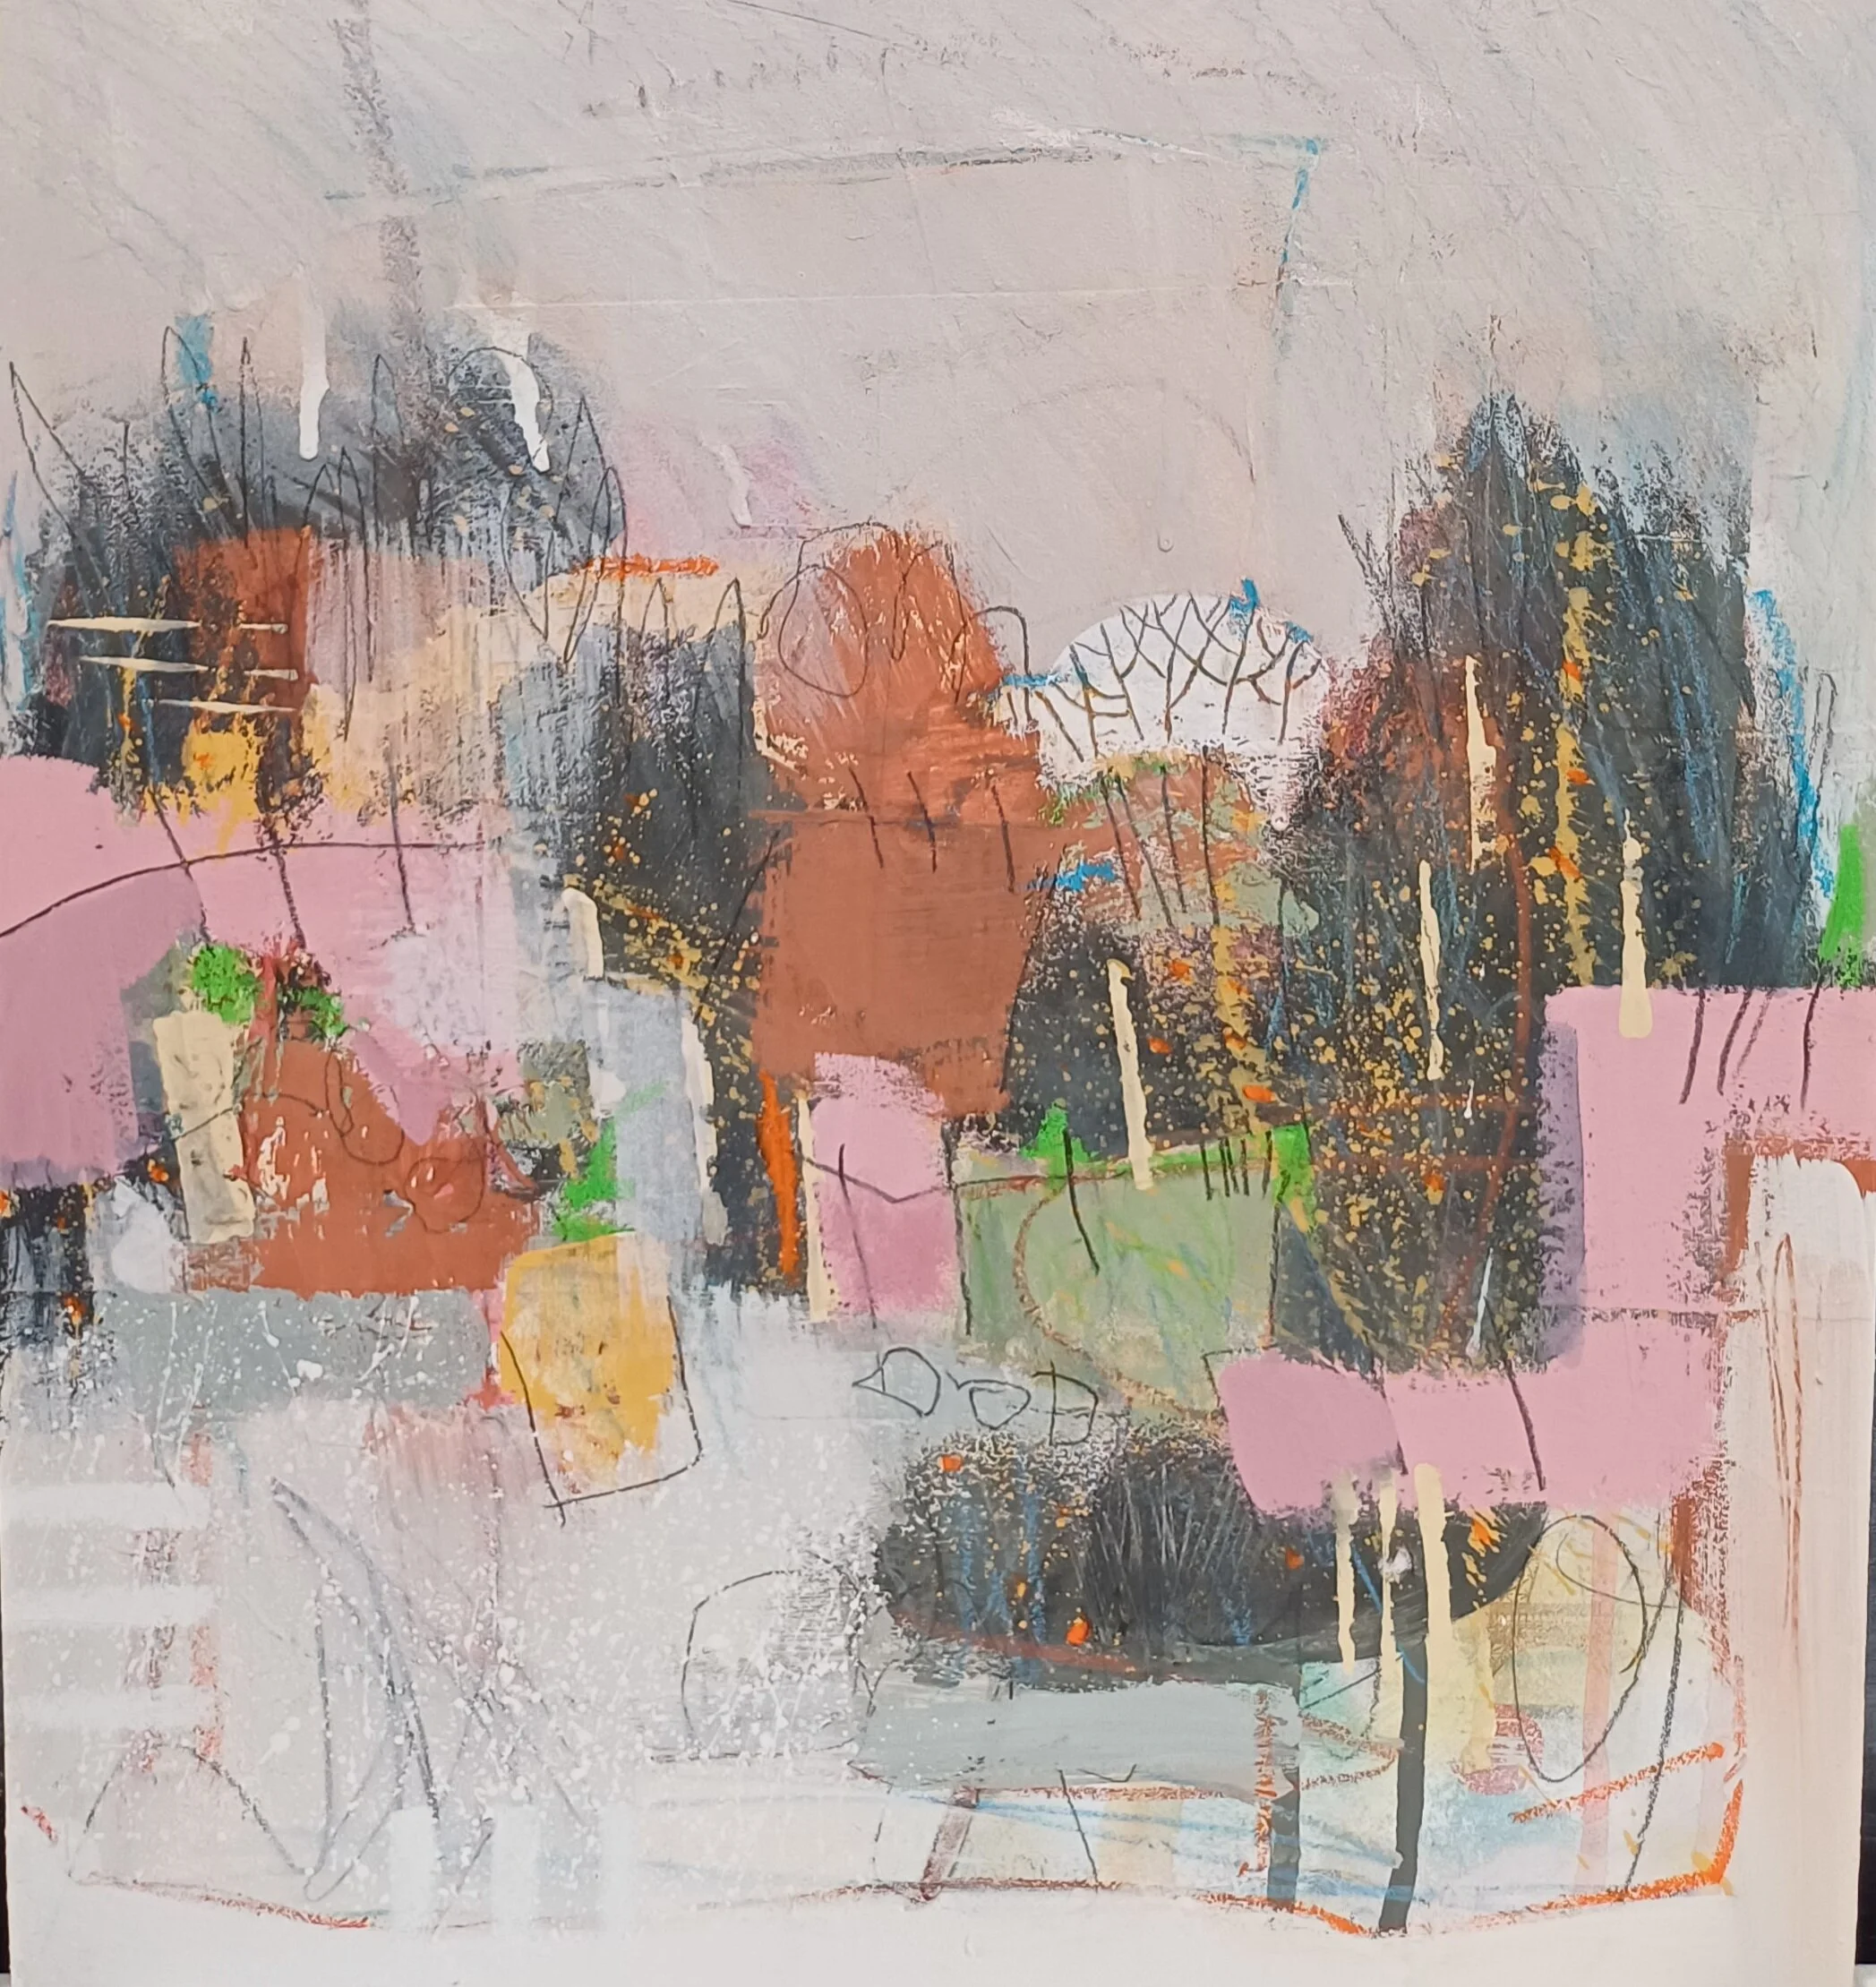
A New Continent
A New Continent- working towards a new series with a new approach

Larger paper, fewer marks, limited palette
It took a lot of work to get to where I wanted to be with this series
I didn’t’ just come home from my travels and reproduce my experience. Because I deliberately didn’t take photos I had to process a feeling: what was my first visual take-away? how did I feel about the landscape? what were the predominant colours? This idea first came to me when I was in the Hudson valley at “Olana” (https://www.olana.org/history/churchs-world/) built by Frederick Edwin Church(https://www.metmuseum.org/toah/hd/chur/hd_chur.htm ) an American Landscape Artist. It is an amazing folly of a house on a hill overlooking the spectacular valley below. I got to thinking- these artists of yesteryear had no cameras and yet they produced awesome huge representational works of incredible detail, by using observation, feeling, and I daresay some intense sketching. So I resisted the urge to snap away and focused on being more mindful of the spaces I was in -I had no sketch book with me so I really had to trust that I would absorb and remember things
When I returned to the UK I wanted to convey space, hotter colour, expansion, the unknown, wilderness (there be bears, snakes, cats, strange bugs).To begin with I chose my palette-limited: An orange watercolour wash, black, some intense English Red mixed with wall glaze ( Which I talked about in my previous Blog) grey and a pale muted subtle grey- green. I needed to do bigger moves, fewer bolder marks and keep more of the paper uncovered to convey that sense of space. I was struck by the perpendicular nature of the American winter trees, and the bigger skies. For years I have been working in the cosy compact rounder softer English landscape, and I was quite happy working small and contained, especially whilst I was going through grief and feeling quite fragile.
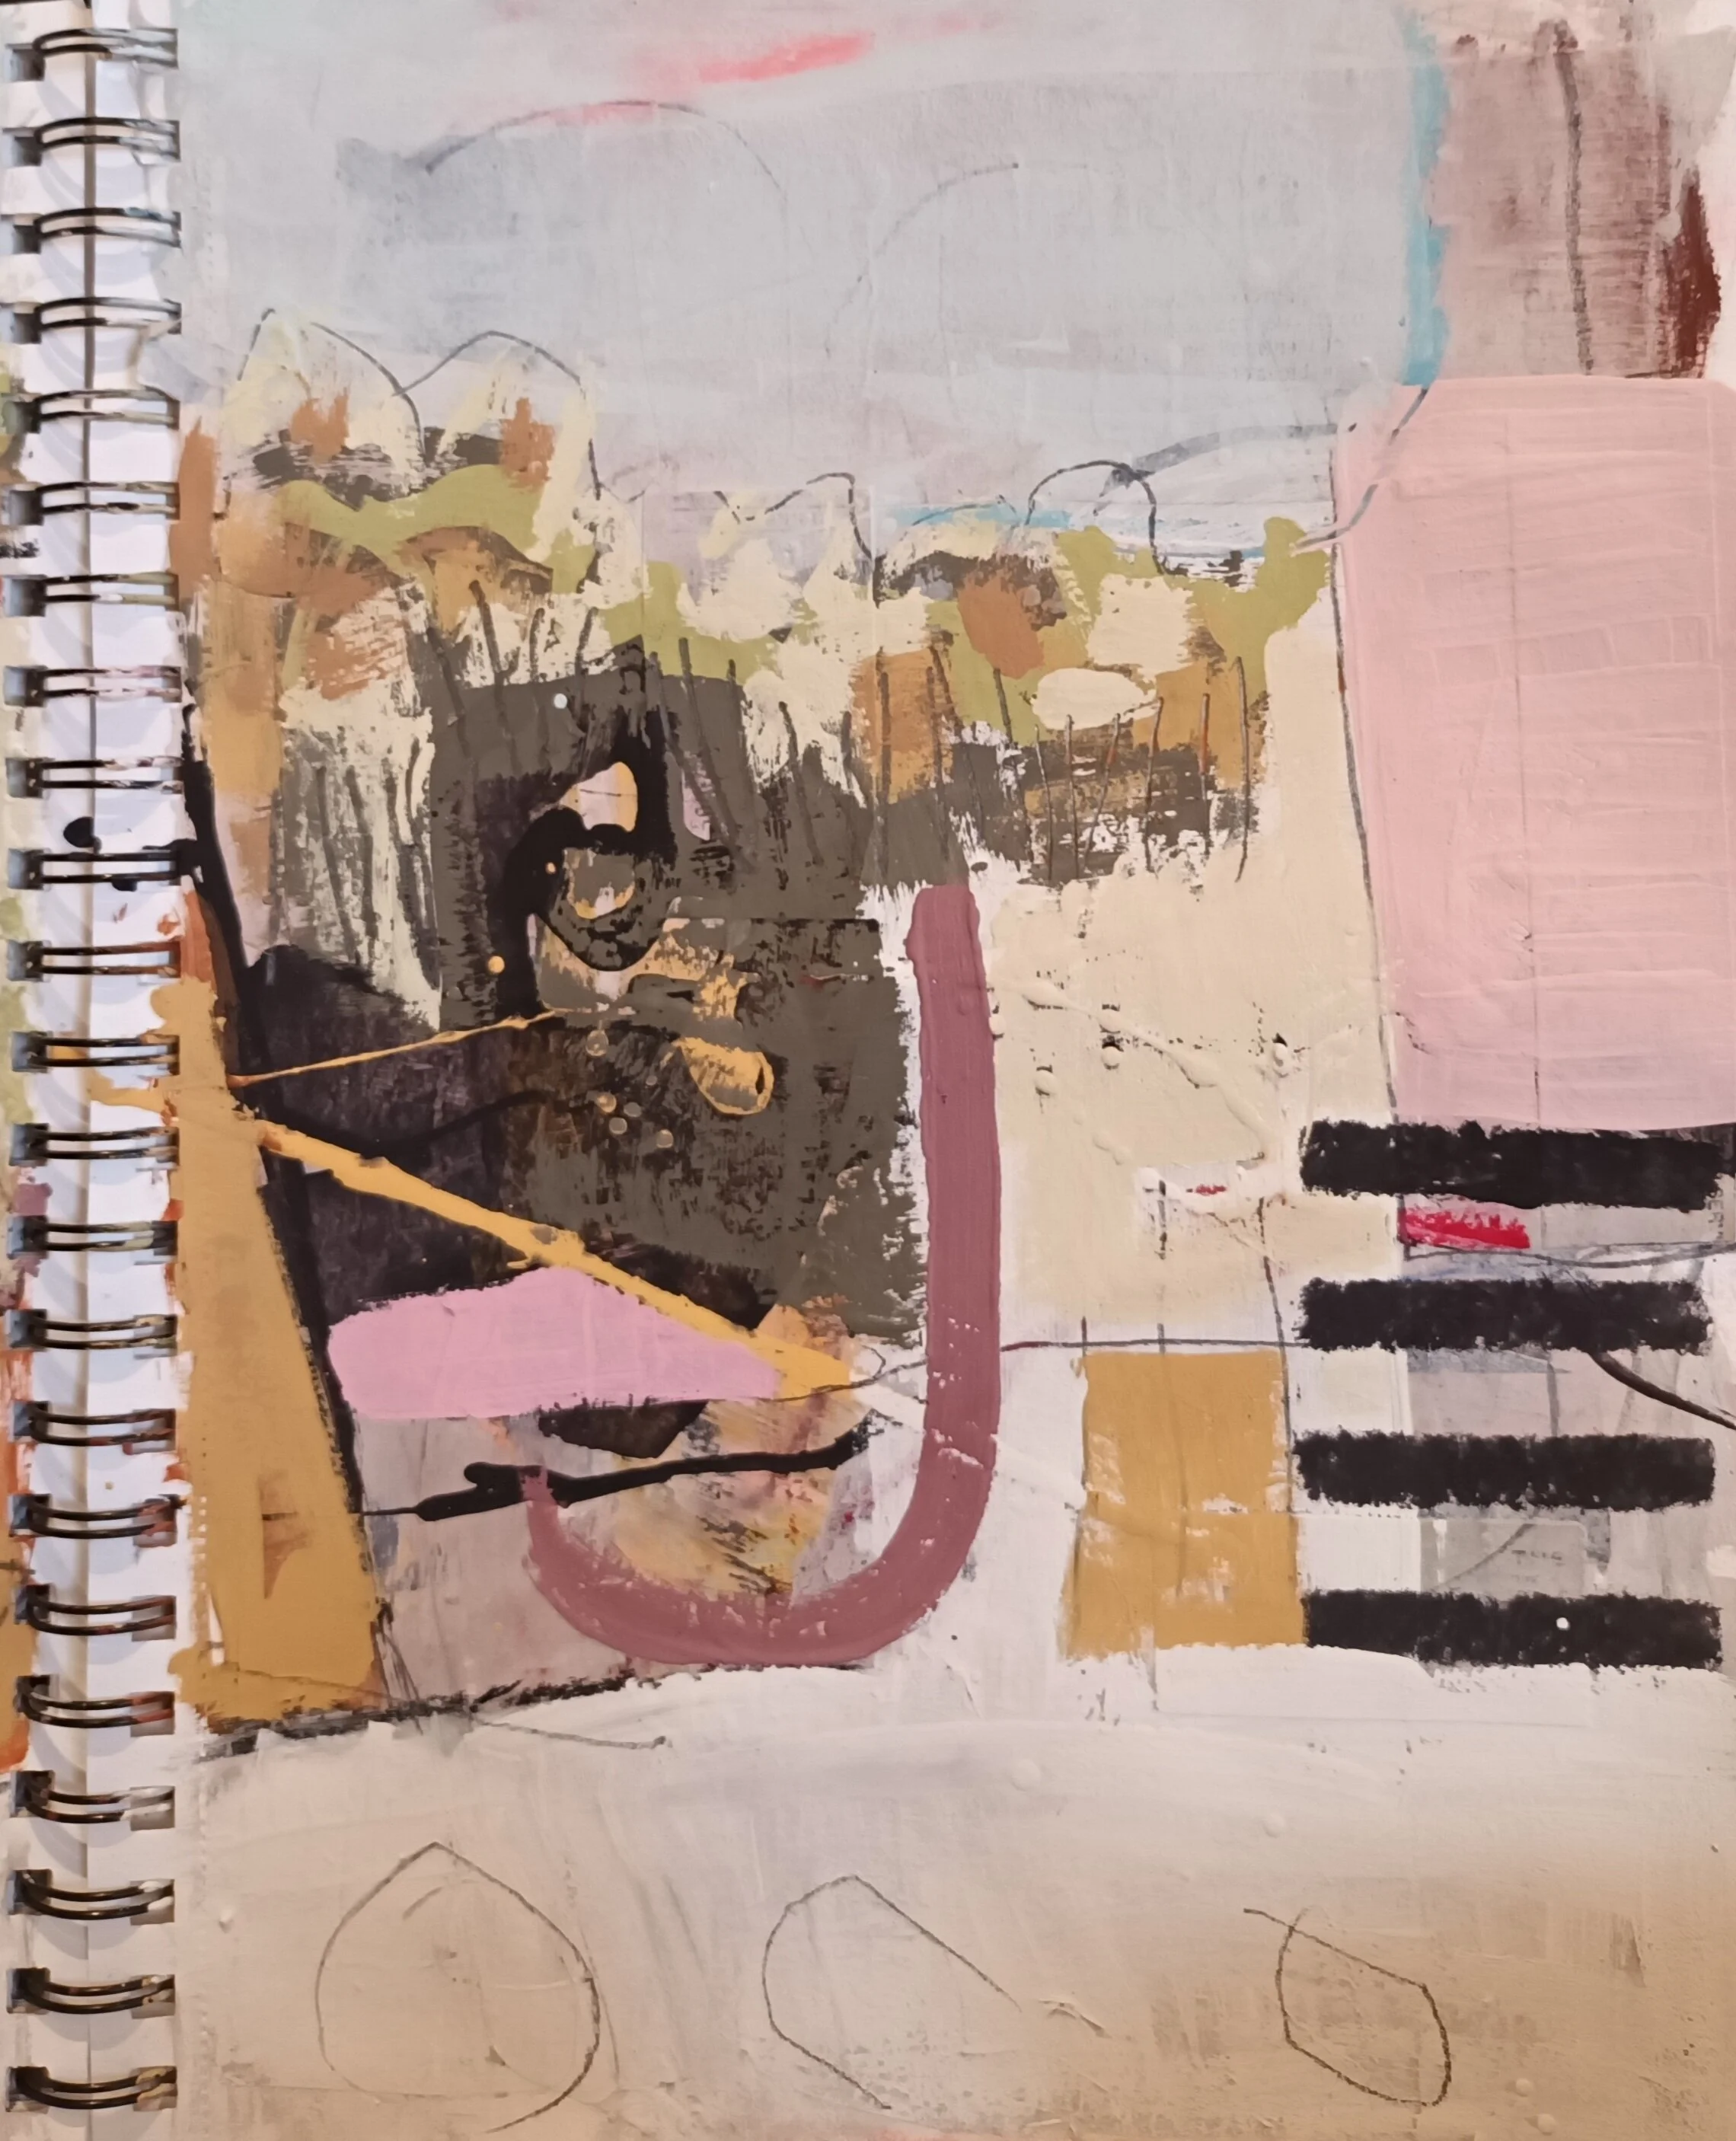
To begin with I did many sketches, first getting the palette to my liking. Establishing this first meant I didn’t have to think about it again-all I had to concentrate on was making my moves bigger -as you can see in the picture below of the sketches- I introduced a yellow that was too garish, so I got rid of that!


I also decided that many of these earlier sketches were too contained and actually too complex- simplicity was what I was aiming for -and that takes courage and trust-I needed to let loose and step out of the zone I am used to

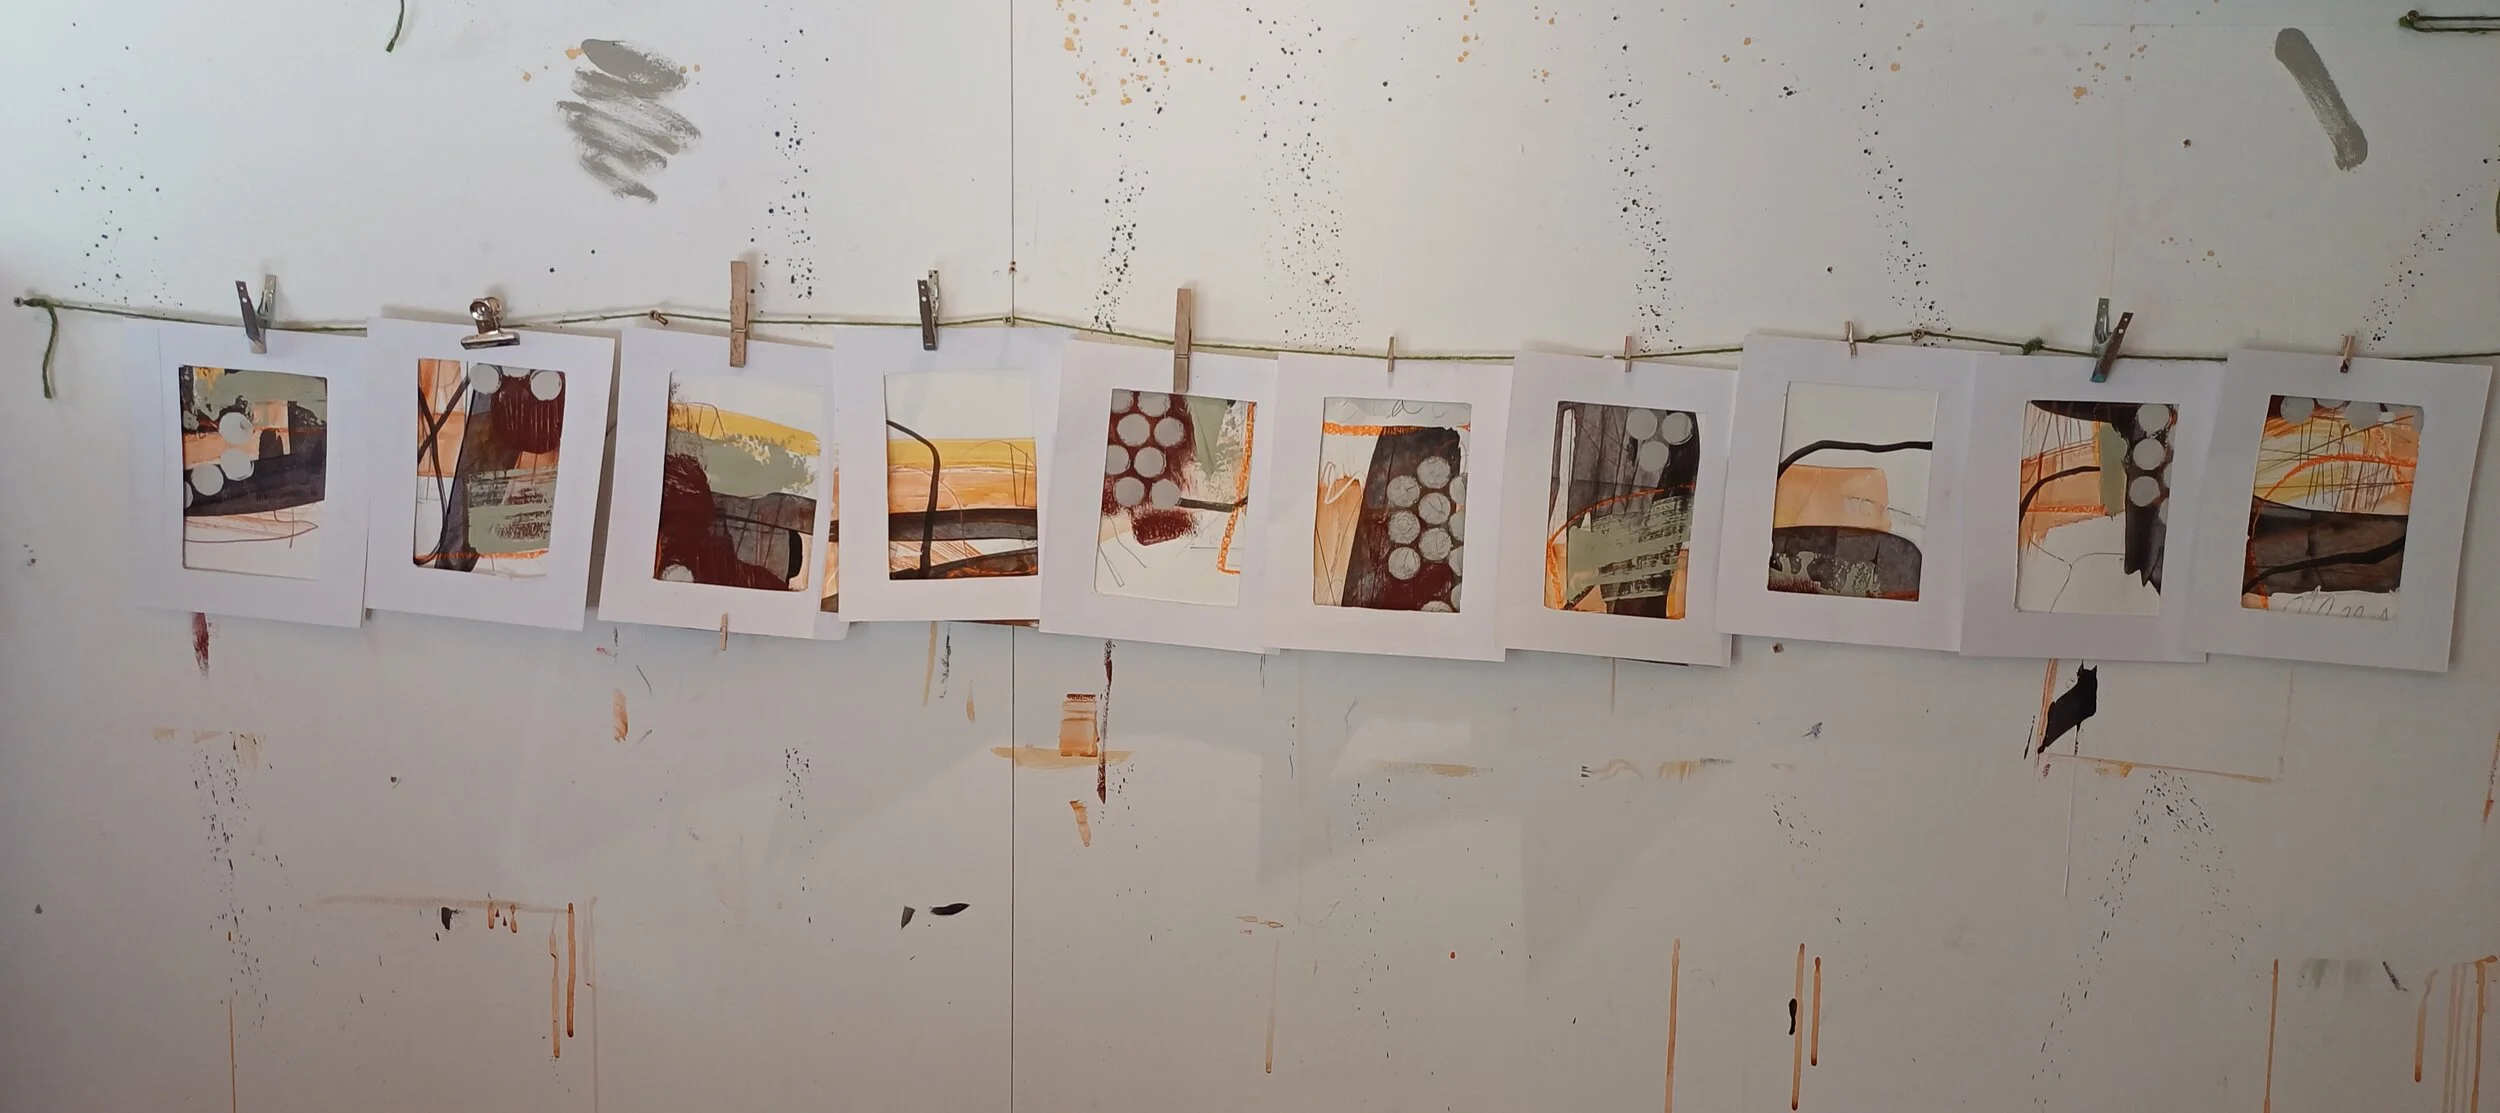
bigger paper for bigger marks
I pinned up much bigger paper on the wall-6 pieces. I also limited my process and decided each application of colour or tool had to be a maximum of 2 moves which forced me to be bolder and only employ the elements that remained in my memory-the thin lines of the winter trees, the red-orange leaves on the forest floor from the Fall, the rubbly muted grey rocks littering the hillsides

limited palette and tools to make fewer marks and simpler shapes-an awl for scoring the paper, a wax candle for resist effects, orange watercolour, chalk pencil, lead pencil, roller with English red, orange oil pastel, black paint and screen-print scraper, mouse grey, and stencil sheet.
Doing lots of small sketches and experiments means I can take lots of risks and not worry about the outcome of anything-and out of that came some work I am very pleased with. Believe me, it didn’t just fall onto the canvas because I am hugely talented-it came from hard work and perseverance and a desire to chase that feeling of a landscape because that is ultimately my deep understanding of it .


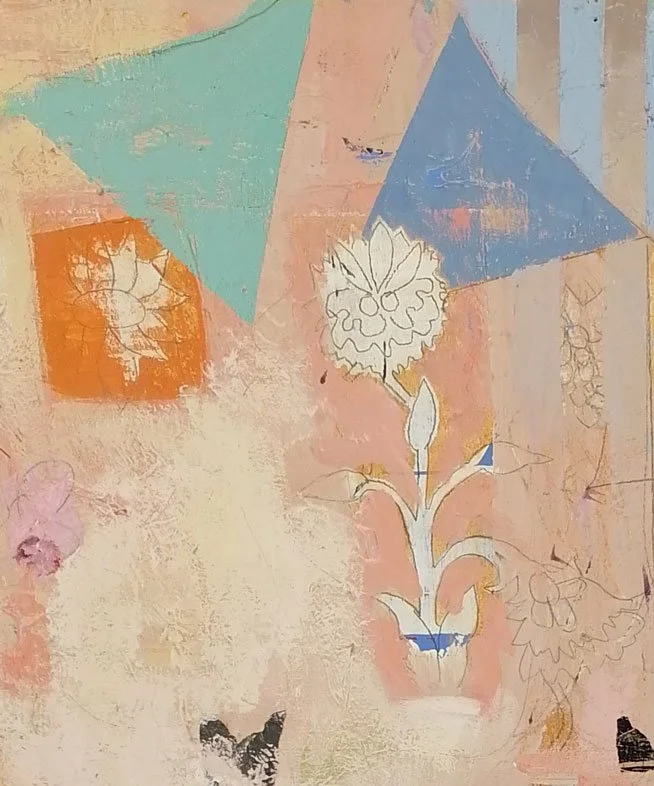
layering
layering

Layering and making collage material
The key to layering in my art practice is to make my own collage material-this not only provides me with interesting and unique stuff to play with but is a really great thing to do when I am feeling stuck, have no ideas, or I am bogged down in the middle of a painting-often inspiration happens in this process of having fun and not worrying about expectations. I get to truly play, and experiment with monoprint, stenciling, and various paint applications. One of my favourite things is printing on dressmakers pattern tissue Fashion design and patterncutting was a big part of my life for many years so I have an endless supply. I also keep all my old paintings and experiments-there are gems in there that can be torn up and used as interesting collage material-no painting is ever a waste of time!

I use certain motifs over and over in my paintings. These have become part of my visual language and they will disappear no doubt when I have exhausted that thing that is currently obsessing me-at the moment I make a lot of black circles (there are boulders and rocks all over the place). I am obsessed with gates and styles-these are barriers, but they are also ways through-which has become the horizontal lines that appear in a lot of my work and barbed wire, that upside down loopy thing-usually drawn in pencil if you look close enough-I suppose the right to roam springs to mind- I love the moors and see it as a right to be able to walk freely in nature- but more and more I come across obstructions where there used to be a path…
I use black collage tissue because I use coal, or ink for dark pigment and these can present problems when layering-coal will shift and bleed and ink will keep striking through to the surface-it seeps through the clay and leaves a stain. Hence I print all my darks and glue them down with wheat paste glue.

What I love about layering is its ability to build history on a surface, which makes for a richer surface to paint on. But there is also a practical reason-because of the nature of clay paint and its ability to absorb moisture, which is it tends to do unevenly, glazing can be difficult. I therefore put all my luminescence in the form of watercolour down over the layered substrate first, underneath the clay and leave gaps for it to shine through. The layered substrate forms a nice surface for accepting watercolour as it is slightly absorbent just like watercolour paper.
The process of applying the layers-which takes a lot of time as each layer has to dry completely- is quite meditative. Beautiful patterns appear, just hinted at below the surface as glazes of paint, a variety of marks and collage interweave with each other. I like the suggestion of something going on below the surface-just like any landscape has a geology, a history of human interventions and an abundance of life that goes on, sometimes apparent, sometimes hidden-I think it appeals to my curiosity.
Next month we will take a look at mud and its transformation into paint

Afterwards
Afterwards

Welcome to the studio. I am excited to share with you a monthly behind the scenes look at what goes on in sketchbooks, what goes on in my head, how thoughts eventually morph into paintings and how the painting process can also morph into thoughts… Brief intros to all this I put on FB and Instagram, but for a more in-depth story, a bigger picture, you have come to the right place!
I want to talk about the Afterwards series - 50 small A6 paintings, in portrait format because they are portraits of feelings, portraits of the landscape that I am inhabiting without my husband Chris- both metaphorically and literally. Our favourite thing was walking in wild places: along the coast, the moors, 3 Caminos in Spain and Portugal and the lake district. And it is in Helvellyn in the lakes where he now rests, a place where Chris and I walked together for the first time in the 1980’s.
It took me a while to venture out on my own again and these paintings are the result: they are small, intimate, tentative, almost fragile and they ask to be looked at quietly and up close. For weeks I had the car packed with my art materials to go out there and do lots of sketching, but the first times out were dismally heartbreaking. I also hadn’t been in my studio for many months whilst Chris was ill, so was terrified of putting marks on paper. I was lost, disorientated, and felt so hopeless. Slowly I settled into a pattern of just going out onto the moors, and it didn’t matter if I sketched or not, just wanted to be outdoors in the beautiful landscape, remembering all the amazing walks we shared and being aware that with or without us, nature prevails. There is a sense of loneliness, aloneness and isolation in the pictures but they are also images of expansive open places, so I am looking out onto a vastness, a future, that is uncertain. They are framed in a white mount-but it is more a window, not a frame- a looking through rather than a holding in - I am looking out, getting ready for the next steps, whatever they might be.
The mount is just a way of displaying the pictures and keeping them clean. I also think framing is a personal thing so I will leave that to you dear purchaser!

working toward a sustainable studio practise
I am working towards a sustainable studio practice, this involves assessing all the materials I use for their compostability, toxicity, environmental impact and usability.

I am working towards a sustainable studio practice. This involves assessing all the materials I use for their compostability, toxicity, environmental impact and usability. It has meant I have had to change the way I approach a painting as binders that keep the pigments stable require research, and lots of experimentation into different ways of application. As an acrylic painter who loved the immediacy of the medium with its quick drying time, I am used to sanding and scratching energetically into my work and building up layers rapidly. Letting go of acrylic binders has been tough as it means leaving paint layers to cure for 24 hours- hello patience! I am using a few different binders depending on the application: For dense fully saturated colour, egg tempera is the way to go. Oils could be used as well but personally, I don’t get on with solvents and the drying times are far too long. Gum Arabic can be used for glazes and making watercolours. I also use a lot of collage, glued with a wheat-based paste. It dries nice and tight and is cheap to make. See below for a great recipe
There is also this great stuff called Methylcellulose that is used in housepainting as a wall glaze to stop eco-paints from shedding dust-it is non-plastic, made from cellulose (plant-based materials) comes in a tin and is fiendishly expensive!! But I use it as a glazing medium to mix with my pigments. I also use it as a final sealer on many of my paintings.

I use paper, card and wooden panels as my substrates. A lot of the wood is scrounged from skips, old floorboards - any smooth wood surface. All wood panels are cradled so they sit 3.2cm from the wall.
I love to forage for my pigments- yellow ochres from building sites, red mud from ploughed fields, black coal from the river, and olive greens from the edges of sunken lanes. Wonderful earth pigments from around the world are also available online which is exciting and opens up the palette substantially. For amazing information and insights into the vast and wonderful world of natural pigments check out the wild pigment project online, and Heidi Gustafasons Book of Earth, and Caro Ross’ book “Found and Ground’ an invaluable resource for those wishing to explore natural inks and paints. I love the idea of working within the limitations of what is available in my fairly immediate environment, because after all my paintings are by and large a response to that environment.

Best glue recipe, that is pretty much edible!
3/4 cup water
1/4 cup cornstarch
2 tbsp sugar
1 tbsp. white vinegar
mix all ingredients together, and stir over low heat until boiling. Allow to cool and put in jar. Keep in fridge when not in use. I have found this the most mould-resistant due to the vinegar. I just take what I need for the day and keep the rest in the fridge. It will keep for up to a month. You can get away with ordinary flour, but it won’t be clear and it will develop a mould. Over time this glue hardens to incredible strength- I have been using it for years in collage work and never had any problems. If you are going to layer things, let it dry overnight before the next layer of paint or collage goes on.